Adding windows to your garage door might sound like a small upgrade, but it can completely transform both your curb appeal and the light inside your space.
Most people do not realize that even a simple window installation can improve energy efficiency—the U.S. Department of Energy reports that properly installed windows can cut heat loss by up to 25 percent. Yet it is not just about saving on bills or getting more sun most window installation mistakes can lead to leaks or door damage if you miss a single measurement. That is why each step matters way more than you think.
Table of Contents
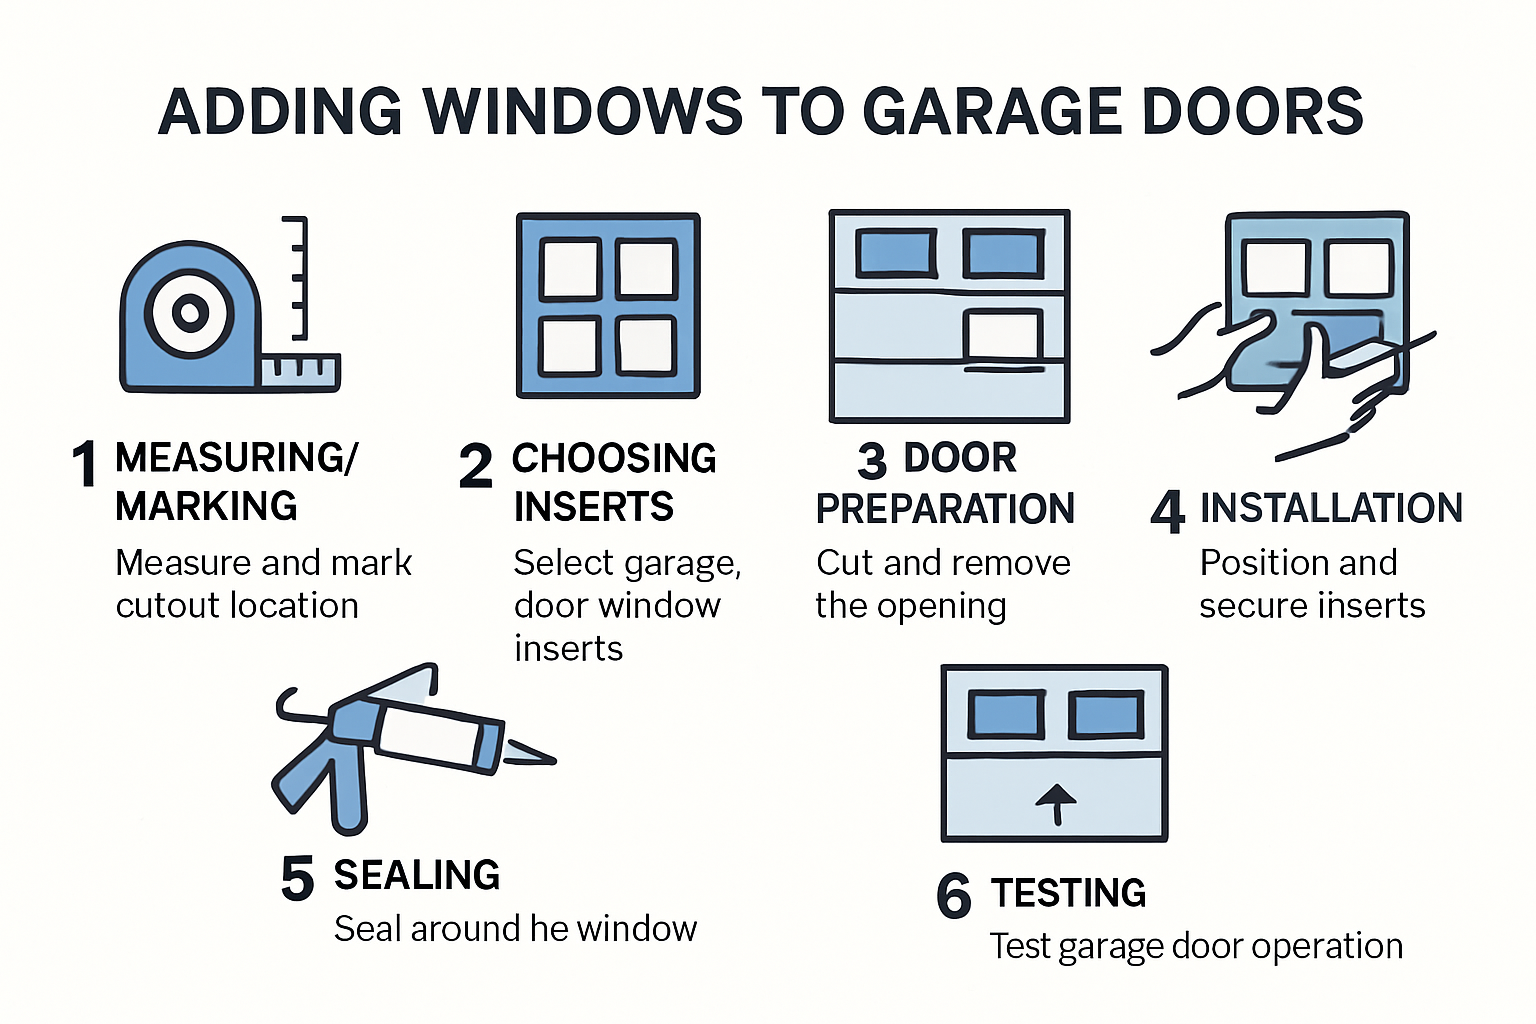
- Step 1: Measure and Mark Window Placement
- Step 2: Select Appropriate Window Inserts
- Step 3: Prepare the Garage Door for Installation
- Step 4: Install the Windows into the Garage Door
- Step 5: Seal and Secure the Windows for Stability
- Step 6: Test Windows for Functionality and Finished Look
Quick Summary
| Key Point | Explanation |
|---|---|
| 1. Measure accurately for window placement | Precise measurements ensure proper alignment and maintain the garage door’s structural integrity during installation. |
| 2. Choose suitable window inserts | Select window styles based on light, privacy, and energy efficiency that complement your garage door design. |
| 3. Prepare the door thoroughly before installation | Removing debris and inspecting panels is essential for a successful window installation and maintaining the door’s strength. |
| 4. Properly seal windows post-installation | Use high-quality sealant to prevent moisture infiltration and ensure durability and energy efficiency of the installed windows. |
| 5. Test windows for functionality | Operate the garage door multiple times to confirm windows remain stable and correctly aligned throughout its motion. |
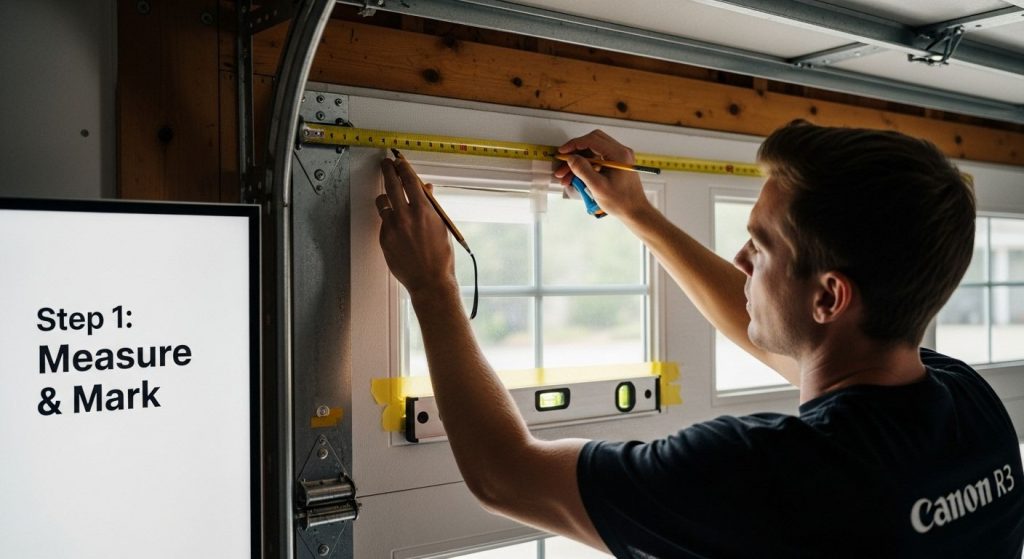
Step 1: Measure and Mark Window Placement
Adding windows to garage doors requires precision and careful planning, starting with accurate measurements and strategic placement. The initial step of measuring and marking your window locations is crucial for achieving a professional and aesthetically pleasing result.
Begin by gathering essential tools for this task. You will need a tape measure, pencil, level, and painter’s tape. These tools will help ensure your window markings are precise and symmetrical. Before making any marks, clean the garage door surface thoroughly to provide a clear workspace.
Carefully examine your garage door’s structure, paying close attention to its panels and reinforcement points. Windows should be positioned between door panels to maintain the door’s structural integrity.
Here is a summary table of essential tools and materials used throughout the window installation process, alongside their primary purposes. Use this to ensure you have everything ready before you begin.
| Tool/Material | Purpose |
|---|---|
| Tape measure | Precise measurement and accurate placement |
| Pencil | Marking window locations on door |
| Level | Ensuring window markings are level |
| Painter’s tape | Temporary holding during dry fit/marking |
| Power drill | Cutting/drilling window openings & hardware |
| Screwdriver | Securing window inserts/mounting hardware |
| Safety glasses & gloves | Personal protection during installation |
| Silicone sealant | Weatherproof sealing around windows |
| Drop cloth | Protecting garage floor from debris |
Typically, most homeowners choose to place windows in the top third or middle section of the door, avoiding areas with significant structural supports.
Measure the width of your garage door and divide it into thirds or quarters to determine potential window placement zones. Mark light pencil lines to create reference points, ensuring your windows will be evenly spaced and centered. Use your level to confirm horizontal and vertical alignment, preventing crooked or misaligned window installations.
Consider the following verification criteria for your measurements:
- Markings are level and symmetrical
- Window placement does not interfere with door hardware or structural supports
- Measurements account for standard window sizes
- Spacing between windows and door edges is consistent
According to the Creative Homeowner’s Ultimate Guide, precision in initial measurements is paramount to a successful window installation. Take your time during this step, double-checking all measurements before proceeding to the next phase of your garage door window project.
Step 2: Select Appropriate Window Inserts
Selecting the right window inserts for your garage door is a critical decision that impacts both aesthetics and functionality. The windows you choose will determine how much natural light enters your space, influence your home’s energy efficiency, and contribute to its overall visual appeal.
Begin by considering the primary purpose of your garage door windows. Are you seeking to enhance natural lighting, improve visual interest, or create a more modern appearance? Different window styles offer unique benefits. Frosted or textured glass provides privacy while allowing light transmission, whereas clear glass delivers maximum visibility and brightness.
Material selection plays a significant role in window performance. Acrylic and polycarbonate windows offer durability and impact resistance, making them excellent choices for areas with potential harsh weather conditions. Tempered glass provides superior safety features, breaking into small, less dangerous fragments if shattered. Insulated glass options help regulate interior temperatures and reduce energy costs.
Consider these key factors when selecting window inserts:
- Compatibility with existing garage door design
- Climate and regional weather patterns
- Desired level of privacy
- Energy efficiency ratings
- Cost and long-term maintenance requirements
According to U.S. Department of Energy, evaluating a window’s U-factor and Solar Heat Gain Coefficient can help you make an informed decision. Lower U-factor values indicate better insulation, while appropriate Solar Heat Gain Coefficient ratings help manage interior temperatures effectively.
Finally, ensure your chosen window inserts complement your existing garage door style and home exterior. Bring sample window panels or color swatches to visualize how they will look when installed. Take time to compare different options, considering not just immediate appearance but also long-term durability and performance.
Step 3: Prepare the Garage Door for Installation
Preparing your garage door for window installation requires meticulous attention to detail and careful planning. This critical step ensures a smooth, professional-looking result that maintains the door’s structural integrity and aesthetic appeal. Safety and precision are paramount during this phase of the project.
Start by completely clearing the work area around your garage door. Remove any tools, vehicles, or obstacles that might interfere with your installation process. Gather all necessary tools including a power drill, screwdriver, measuring tape, safety glasses, work gloves, and a clean drop cloth to protect your garage floor from potential debris.
Carefully inspect the garage door panels where you plan to install windows. Look for any existing damage, warping, or structural weaknesses that might compromise the window installation. Check panel reinforcement points and ensure the areas you have previously marked can support window inserts without compromising the door’s overall strength.
Before cutting any openings, you will need to temporarily remove the garage door panel or disable the door’s automatic opening mechanism. This prevents accidental movement during installation and reduces safety risks. Learn more about proper garage door preparation to ensure a successful window installation project.
Consider these critical preparation steps:
- Verify door panel thickness matches your selected window insert
- Confirm no electrical wiring or internal supports conflict with planned window location
- Clean the installation area thoroughly to remove dirt and potential adhesion barriers
- Double-check all measurements before making any cuts
According to the U.S. Department of Energy, proper preparation is essential for maintaining the door’s energy efficiency and structural performance. Take your time during this stage, as rushed work can lead to costly mistakes or potential safety hazards.
Step 4: Install the Windows into the Garage Door
Window installation represents the most precise and challenging phase of transforming your garage door. Careful execution determines whether your final result looks professional or amateurish. This step requires patience, steady hands, and methodical approach to ensure windows are securely and accurately integrated into your garage door panels.
Begin by dry fitting your selected window inserts into the prepared openings. This preliminary check allows you to confirm precise measurements and identify any potential alignment issues before permanent installation. Use painter’s tape to temporarily hold window panels in place, checking for level positioning and symmetrical spacing. Slight adjustments now can prevent significant problems later in the installation process.
Apply a high-quality silicone sealant around the interior and exterior edges of each window opening. This creates a weatherproof barrier that prevents moisture infiltration and ensures long-lasting performance. Work systematically, applying a consistent bead of sealant that completely surrounds the window’s perimeter. Learn more about professional garage door modifications to enhance your understanding of best practices.
Consider these critical installation guidelines:
- Use non-corrosive mounting hardware specific to garage door materials
- Apply even pressure when securing window inserts
- Verify windows are level and flush with door surface
- Clean excess sealant immediately to prevent unsightly residue
According to the U.S. Department of Energy, proper window installation is crucial for maintaining energy efficiency. After securing windows, test their stability by gently pressing around each edge. The windows should feel firmly anchored with no noticeable movement or gaps.
Once installation is complete, step back and visually inspect your work from multiple angles. Ensure windows are evenly spaced, level, and seamlessly integrated into the garage door’s overall design. Minor adjustments can be made using specialized mounting hardware, but significant errors might require professional intervention.
Step 5: Seal and Secure the Windows for Stability
Sealing and securing your newly installed garage door windows is the final critical step that ensures long-term performance, weather resistance, and aesthetic quality. Proper sealing prevents moisture infiltration, reduces energy loss, and protects your investment from potential structural damage.
Begin by thoroughly cleaning the window edges and surrounding garage door panel surfaces. Use a mild solvent or alcohol-based cleaner to remove any residual dust, grease, or installation debris that might compromise the sealing process. Ensure the surfaces are completely dry before applying any sealants or weatherstripping to guarantee maximum adhesion and effectiveness.
Select a high-quality silicone-based exterior sealant specifically designed for garage door applications. Apply a continuous, even bead around the entire window perimeter, paying extra attention to corners and potential gap areas. Use a caulking tool or your finger to smooth the sealant, creating a seamless, professional-looking finish that prevents water and air penetration. Explore our comprehensive guide to garage door maintenance for additional insights into long-term window care.
Consider these critical sealing guidelines:
- Use weatherstripping compatible with your specific door material
- Apply sealant in moderate temperature conditions
- Avoid overworking the sealant, which can create uneven coverage
- Allow sufficient curing time before testing window functionality
According to the U.S. Department of Energy, selecting the right weatherstripping material is crucial for maintaining energy efficiency. Vinyl and metal weatherstripping options provide excellent durability and compression, creating a tight seal that helps regulate interior temperatures and reduce energy costs.
After applying sealant, allow it to cure completely according to manufacturer instructions. Test the windows by gently pressing around their edges to confirm a secure, uniform seal.

Open and close the garage door multiple times to verify that the windows remain stable and do not interfere with the door’s normal operation. A successful installation will feel solid, look clean, and provide enhanced natural lighting without compromising your garage door’s structural integrity.
Below is a quick reference checklist of verification and testing criteria for your garage door window installation. Use this table after each major step to confirm alignment, security, and professional results.
| Checklist Item | When to Verify |
|---|---|
| Markings are level and symmetrical | After measuring and marking |
| No interference with door hardware/supports | Before cutting/installing |
| Spacing between windows and door edges is consistent | After marking and dry fit |
| Surfaces clean and dry before sealing | Before applying sealant |
| Windows remain stationary during door movement | After installation, during testing |
| No visible gaps or uneven sealing | After sealing and curing |
| Smooth, consistent appearance from all angles | Final inspection |
Step 6: Test Windows for Functionality and Finished Look
Testing your newly installed garage door windows represents the final verification stage of your project. Comprehensive testing ensures that your windows not only look great but also perform perfectly under various conditions. This crucial step transforms your careful installation work into a successful home improvement project.
Begin by operating the garage door through several complete open and close cycles. Watch carefully for any signs of window interference or unusual movement. Windows should remain stable throughout the door’s entire range of motion, with no shifting, rattling, or unexpected contact points. Pay close attention to how the windows align when the door is in different positions, ensuring they maintain their positioning without stress or strain.
Visually inspect each window from multiple angles and lighting conditions. Check for consistent sealing, uniform appearance, and absence of gaps or uneven edges. Run your hand gently around the window perimeter, feeling for any irregularities in the installation. Natural light will help reveal subtle imperfections that might have been missed during the installation process. Explore our detailed guide on garage door window maintenance to help you understand long-term care.
Consider these critical testing criteria:
- Windows remain stationary during door movement
- No visible gaps or uneven sealing
- Smooth, consistent appearance from all viewing angles
- No interference with door mechanisms
According to the National Renewable Energy Laboratory, proper fenestration testing involves examining both functional performance and aesthetic integration. Test the windows under different temperatures and humidity levels if possible, as these conditions can reveal potential installation weaknesses.
Finalize your assessment by viewing the garage door from the street, checking that the new windows enhance your home’s exterior appearance. The windows should look intentional, well-integrated, and professional. A successful installation creates a seamless look that appears as though the windows were original to the door design.
Ready to Transform Your Garage Door With Stunning Windows?
You have just learned how precise measurements, professional-grade window inserts, and careful installation directly impact the look and energy efficiency of your garage. But the reality is that tackling each of these steps alone can feel overwhelming. Maybe you are worried about getting clean, symmetrical cuts or choosing the right inserts for Seattle’s climate. Perhaps concerns about preserving your garage door’s integrity—or even just finding time—are holding you back.

Let the Summit Garage Doors team solve these challenges for you. Our experienced technicians handle everything from accurate measurements to seamless, weatherproof installations backed by years of local expertise. Whether you need help picking the perfect window style or want a flawless finish, we ensure your garage stands out while keeping your home protected.
Visit our garage door installation guide for Seattle homeowners for more insights, then connect with us at Summit Garage Doors today. Take action now and enjoy a brighter, safer, and more beautiful garage door—customized to your needs.
Frequently Asked Questions
How do I measure for windows in my garage door?
Begin by measuring the width of your garage door and dividing it into thirds or quarters to determine potential window placement zones. Make light pencil marks to create reference points, ensuring windows will be evenly spaced and centered.
What types of window inserts are suitable for garage doors?
Consider acrylic, polycarbonate, tempered glass, or insulated glass options. Each offers various benefits such as durability, safety, energy efficiency, and visual appeal, so select based on your priorities and climate.
How can I ensure my garage door windows are properly sealed?
Use a high-quality silicone sealant around the entire window perimeter after installation. Make sure the surfaces are clean and dry before applying the sealant to create a seamless, weatherproof barrier that prevents moisture infiltration.
What are the common mistakes to avoid when adding windows to garage doors?
Avoid rushing measurements, neglecting structural reinforcement points, and failing to ensure proper sealing. It’s essential to take time in each step, from accurate measurements to testing for functionality after installation.
Recommended
- Garage Door Installation Guide for Seattle Homeowners 2025 – Summit Garage Doors | Seattle’s #1 Garage Door Repair & Installation
- Garage Door Opener Installation in Seattle: 2025 Guide for Homeowners – Summit Garage Doors | Seattle’s #1 Garage Door Repair & Installation
- Garage Door Replacement Process for Seattle Homeowners 2025 – Summit Garage Doors | Seattle’s #1 Garage Door Repair & Installation
- Garage Door Replacement Process: Seattle Area Guide 2025 – Summit Garage Doors | Seattle’s #1 Garage Door Repair & Installation
- Measuring Windows for Blinds: The Simple Step-by-Step Guide