Emergency garage door repairs catch Seattle homeowners off guard, especially with the wild swings in local weather and moisture. Here is something most people miss. Nearly 20,000 garage door-related injuries occur every year in the US and a quick DIY fix can actually save you time and a costly visit. Knowing exactly what to look for right now means you could avoid the steep price of a total replacement.
Table of Contents
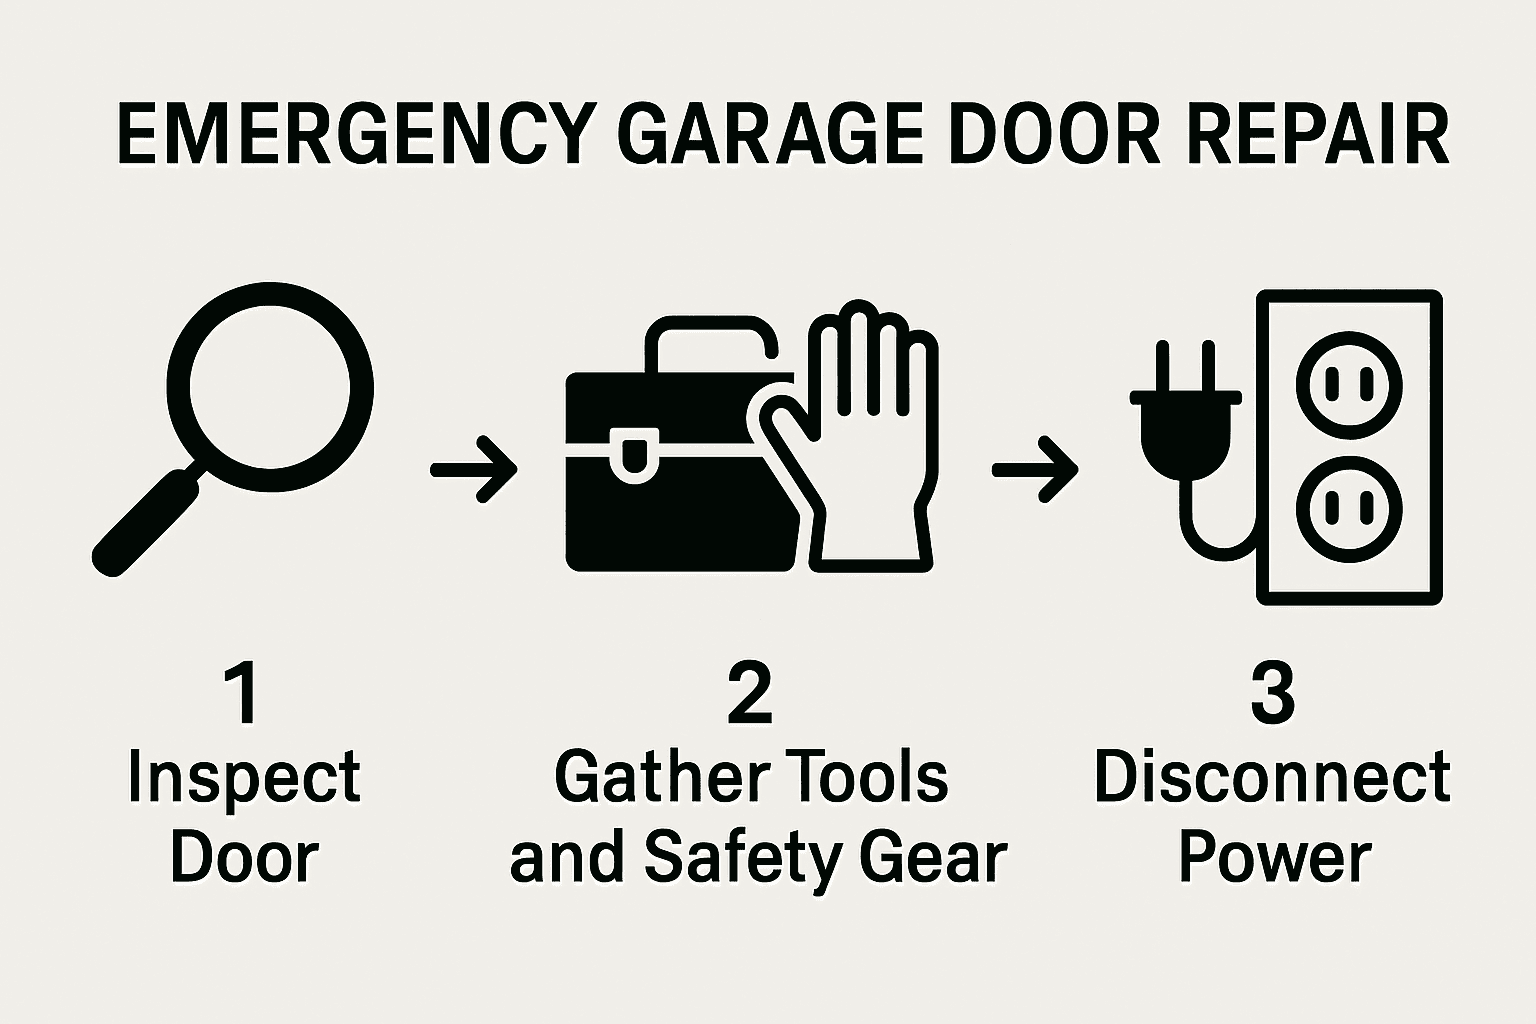
- Step 1: Assess The Garage Door Problem
- Step 2: Gather Necessary Tools And Safety Gear
- Step 3: Disconnect The Power Supply
- Step 4: Identify And Fix Common Issues
- Step 5: Reconnect Power And Test The Door
- Step 6: Perform A Final Safety Check
Quick Summary
| Key Point | Explanation |
|---|---|
| 1. Assess your garage door issue first | Carefully observe sounds and movements to identify potential problems before proceeding with repairs. |
| 2. Use proper safety gear when repairing | Equip yourself with safety glasses and gloves to protect against accidental injuries during the repair process. |
| 3. Disconnect power to ensure safety | Always unplug the garage door opener and switch off the circuit breaker before starting any repairs to avoid electrical accidents. |
| 4. Test auto-reverse function post-repair | Verify that the garage door reverses when it detects an obstruction, ensuring the safety feature is functioning properly. |
| 5. Seek professional help if unsure | Some mechanical issues require expert intervention; never hesitate to call a technician for complex problems. |
Step 1: Assess the Garage Door Problem
When confronting an emergency garage door repair situation, the first critical step is accurately diagnosing the underlying problem. Proper assessment can mean the difference between a quick fix and an expensive replacement. Homeowners in Seattle often encounter unique garage door challenges due to the region’s variable weather conditions and frequent moisture.
Start by carefully observing your garage door’s behavior and listening for specific sounds or noting unusual movements. Visual inspection is key. Walk around the entire door system, examining tracks, springs, cables, and rollers for signs of wear, misalignment, or damage. Look for rust, fraying cables, bent tracks, or loose hardware that might indicate potential failure points. Pay special attention to the bottom rubber seal and side weatherstripping, which can deteriorate faster in Seattle’s damp environment.
Next, test the door’s manual operation. Disconnect the automatic opener and attempt to lift the door halfway by hand. A well-functioning garage door should remain in place when released, indicating balanced tension in the springs. If the door drops quickly or feels unusually heavy, this signals potential spring or cable issues requiring immediate professional attention. Our guide on garage door repairs in King County provides additional insights into common mechanical problems specific to the region.
Acoustic clues can also reveal significant information. Listen for grinding, scraping, or popping sounds during door movement. These noises often indicate:
- Worn rollers
- Misaligned track
- Damaged spring mechanisms
- Insufficient lubrication
Remember that emergency garage door repair isn’t about immediate replacement but strategic diagnosis. Understanding the specific symptoms helps determine whether you need minor adjustments or require professional intervention. By methodically assessing your garage door’s condition, you can prevent more extensive damage and potentially save significant repair costs.
Step 2: Gather Necessary Tools and Safety Gear
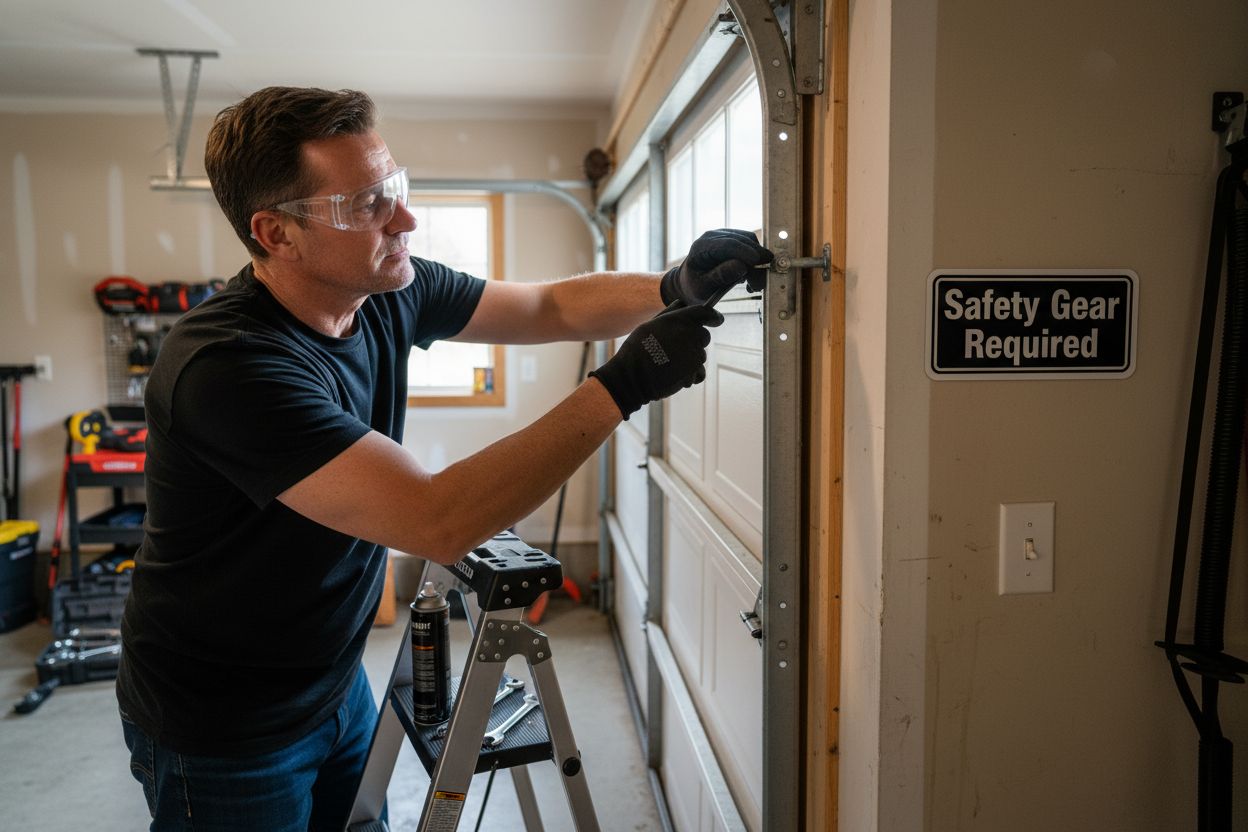
Before diving into emergency garage door repair, preparing your workspace with the right tools and protective equipment is crucial for both safety and efficiency. Seattle homeowners should approach garage door repairs with methodical preparation, understanding that proper equipment can prevent injuries and streamline the repair process.
Safety gear is your first priority. Never underestimate the importance of personal protection when working with heavy mechanical systems. Put on impact-resistant safety glasses to shield your eyes from potential spring or cable fragments. Thick work gloves are essential to protect your hands from sharp metal edges and prevent potential cuts or pinching injuries. According to workplace safety guidelines from OSHA, proper personal protective equipment is fundamental in preventing workplace injuries.
For your tool collection, you will need a comprehensive set that allows for thorough garage door diagnostics and potential repairs. Gather an adjustable wrench, socket set, screwdrivers with multiple head types, pliers, and a sturdy ladder that can support your weight safely. A tape measure becomes invaluable when checking alignment and measuring potential replacement parts. Lubricant and a clean rag should also be part of your toolkit to address minor friction issues during your inspection.
Additional items to include in your emergency repair kit:
- Replacement rollers
- Spare cable clips
- Penetrating oil
- Chalk or marking pencil
- Work light or flashlight
Prepare a clean, well-lit workspace near your garage door with all tools within easy reach. Organize your tools on a stable surface or workbench, ensuring each item is accessible and in good condition.
The following table summarizes the essential tools and safety gear mentioned for emergency garage door repairs, explaining their purpose and importance during the process.
| Tool/Safety Gear | Purpose |
|---|---|
| Safety glasses | Protect eyes from fragments and debris |
| Thick work gloves | Prevent cuts and injuries to hands |
| Adjustable wrench | Tighten or loosen varied hardware |
| Socket set | Remove or secure bolts of different sizes |
| Screwdrivers (various) | Adjust screws and opener panel connections |
| Pliers | Grip cables, remove clips, or tighten small parts |
| Sturdy ladder | Safely reach higher sections of the garage door |
| Tape measure | Measure alignment and replacement parts accurately |
| Lubricant & rag | Reduce friction, clean moving parts |
| Work light/flashlight | Improve visibility in dimly lit garage areas |
Step 3: Disconnect the Power Supply
Disconnecting the power supply is a critical safety step that prevents potential electrical accidents and unexpected garage door movement during repairs. Electrical systems can be unpredictable, and a momentary lapse in caution could result in serious injury. Safety is paramount when working with mechanical systems that involve electrical components.
Locate your garage door opener’s power source, which is typically a standard electrical outlet near the opener mechanism or the circuit breaker box. For maximum safety, you will want to completely eliminate electrical current to the system. Begin by unplugging the opener from its wall outlet. If the outlet is difficult to reach or obscured, use a flashlight to help locate it precisely. In cases where the plug is not easily accessible, proceed to your home’s main circuit breaker panel.
At the circuit breaker, identify and switch off the specific circuit controlling the garage door opener. This requires careful attention to your home’s electrical layout. Look for a clearly labeled breaker corresponding to the garage or exterior electrical systems. If the breaker is not labeled, use a circuit tester or carefully switch off breakers one at a time, verifying the opener is indeed powered down. According to safety recommendations from the U.S. Consumer Product Safety Commission, completely disconnecting power eliminates risks of accidental activation.
To verify complete power disconnection, attempt to operate the garage door opener using its wall control or remote. No movement or sound should occur if the power is successfully cut. Additional verification steps include:
- Check that interior wall controls are unresponsive
- Confirm remote controls produce no door movement
- Visually inspect that all electrical indicators on the opener are dark
Remember, proper power disconnection is not just about stopping the door but ensuring absolute electrical isolation. Take your time, remain methodical, and prioritize your personal safety throughout this critical preparation stage.
Step 4: Identify and Fix Common Issues
Emergency garage door repairs often involve addressing specific mechanical problems that can compromise your door’s functionality. Systematic troubleshooting is key to resolving issues efficiently and preventing more extensive damage to your garage door system. Seattle homeowners frequently encounter unique challenges due to the region’s moisture and temperature variations.
Begin by examining the door’s springs, which are critical components that manage tension and facilitate smooth movement. Broken or stretched springs can cause significant operational problems. Look for visible signs of wear such as gaps, rust, or irregular coiling. If a spring appears damaged, do not attempt to replace it yourself. Garage door springs are under extremely high tension and can cause serious injury if improperly handled. Our comprehensive guide to garage door parts and accessories provides additional insights into professional spring replacement.
Next, inspect the door’s tracks and rollers for alignment and wear. Misaligned tracks can cause grinding noises and uneven door movement. Using your wrench, gently check for loose mounting brackets and tighten them carefully. Rollers should move smoothly without wobbling or catching. Apply a small amount of white lithium grease to rollers and track surfaces to reduce friction and minimize wear. Pay special attention to the bottom rollers, which experience the most stress during daily operations.
Critical signs that indicate immediate repair needs include:
- Unusual grinding or scraping sounds during door movement
- Visible gaps or bends in track alignment
- Rollers that stick or do not rotate smoothly
- Uneven door movement or resistance when manually operating
Verify your repairs by manually lifting the door halfway and releasing it. A properly functioning garage door should remain stationary, indicating balanced spring tension and smooth mechanical operation. If the door falls or rises unexpectedly, this signals underlying mechanical issues requiring professional intervention. Remember, while DIY repairs can address minor problems, complex mechanical failures demand expert attention to ensure safety and proper functionality.
Step 5: Reconnect Power and Test the Door
After completing repairs, reconnecting power and systematically testing your garage door is crucial to ensuring your emergency repair was successful. Careful, methodical testing will help you verify that all mechanical and electrical systems are functioning correctly and safely. This final step transforms your repair work from potential to confirmed resolution.
Begin by returning power to the garage door system. If you disconnected the circuit breaker, carefully switch the appropriate breaker back to its original position. For outlet-powered systems, plug the garage door opener back into its electrical socket. Watch and listen closely during this initial power restoration. Unexpected sounds, sparking, or immediate door movement could indicate unresolved issues that require professional attention.
Next, test the door’s manual and automatic operation sequences. Start by using the wall-mounted control panel to operate the door. Observe its movement carefully, checking for smooth, balanced lifting and lowering. The door should move evenly without jerking, grinding, or unusual resistance. Follow this by testing the remote control, ensuring it communicates effectively with the opener mechanism. Our comprehensive garage door services guide offers additional insights into proper door functionality.
Critical verification points during testing include:
- Consistent, smooth door movement in both open and close cycles
- No unusual grinding, scraping, or clicking sounds
- Complete stop and reverse when encountering light obstruction
- Proper alignment at top and bottom of travel
- Remote and wall control responsiveness
If any irregularities persist after your repair attempts, do not continue operating the door. Persistent issues suggest more complex mechanical problems that require professional diagnostic skills. Attempting further repairs without proper expertise could potentially cause more significant damage or create safety risks.
This troubleshooting table organizes common garage door problems, their likely causes, and recommended solutions as described in the repair guide.
| Problem | Likely Cause | Solution |
|---|---|---|
| Grinding or scraping sounds | Worn rollers or tracks | Lubricate rollers, check and realign tracks |
| Door drops or feels heavy | Spring or cable issues | Seek professional help for spring/cable repair |
| Uneven movement or resistance | Misaligned tracks | Tighten brackets, realign tracks |
| Door does not move using controls | Power disconnected | Check outlet or circuit breaker, reconnect |
| Door does not reverse on obstruction | Faulty auto-reverse | Test with object, call professional if needed |
| Rollers stick or do not roll smoothly | Damaged/dirty rollers | Clean and lubricate rollers |
Step 6: Perform a Final Safety Check
The final safety check is a critical step that transforms your emergency garage door repair from a potential risk to a confirmed safe solution. Comprehensive verification ensures that all repair work protects your home, family, and property from potential mechanical failures or unexpected door movements. This methodical approach separates amateur repairs from professional-grade maintenance.
Begin by testing the door’s auto-reverse mechanism, a crucial safety feature that prevents crushing hazards. Place a sturdy object like a wooden board or rolled towel on the ground in the door’s path. When the door closes, it should immediately detect the obstruction and reverse direction automatically. Modern garage doors are engineered with multiple safety triggers, but manual testing confirms these critical protective systems are functioning correctly. If the door fails to stop and reverse upon contact, this indicates a serious safety malfunction requiring immediate professional attention.
Next, conduct a visual and auditory inspection of the entire door system. Examine all components for signs of stress, misalignment, or potential future failure points. Listen carefully during multiple open and close cycles for any unusual sounds that might suggest underlying mechanical issues. Our guide to garage door repairs in King County provides additional insights into comprehensive safety assessments.
Critical safety verification points include:
- Smooth, consistent door movement without jerking
- Complete and immediate auto-reverse function
- No visible wear on springs, cables, or tracks
- Proper door balance when manually operated
- Secure mounting of all mechanical components
Remember that some safety features require professional calibration. While your emergency repair might resolve immediate issues, complex safety mechanisms often need expert fine-tuning. If you experience any uncertainty or notice persistent irregularities during your final check, contact a professional garage door technician. Your diligence in performing this final safety assessment can prevent potential accidents and extend the life of your garage door system.
Get Reliable Emergency Garage Door Help When You Need It Most
Experiencing a malfunctioning garage door can be stressful, especially when quick repairs matter for your family’s safety and your home’s security. If you’ve followed the steps for assessing damage, disconnecting the power, and testing your door but still feel unsure or see persistent issues, remember that delaying professional help can lead to bigger, more expensive problems. Seattle’s unique climate and unpredictable garage door challenges demand solutions that last. When your door grinds, sticks, or fails its safety checks, Summit Garage Doors is ready to restore your peace of mind.
Let our seasoned technicians handle the toughest repairs and replacements so you do not have to worry about springs snapping or doors jamming at the worst moments. For fast, expert garage door repairs anywhere in Seattle, visit Summit Garage Doors today. If you want to learn more about comprehensive garage door repairs or need emergency service right now, check our guide to garage door repairs in King County or see our full range of garage door services for Seattle homeowners. Do not wait until a small mechanical issue turns into a full replacement. Act now and secure your home with trusted local experts.
Frequently Asked Questions
How do I diagnose my garage door issue?
Begin by observing your garage door’s behavior and sounds. Perform a visual inspection of tracks, springs, cables, and rollers for wear or damage. Test the door’s manual operation to assess spring tension and identify any issues.
What tools do I need for emergency garage door repairs?
You’ll need an adjustable wrench, socket set, various screwdrivers, pliers, safety glasses, thick work gloves, and a ladder. Additionally, include lubricants, a clean rag, and replacement parts in your toolkit for effective repairs.
How do I ensure safety before starting repairs?
Always disconnect the power supply by unplugging the garage door opener or turning off the circuit breaker. Use safety gear, such as impact-resistant glasses and gloves, to protect yourself from accidents while working on the garage door.
What should I check if my garage door makes unusual noises?
Listen for grinding, scraping, or popping sounds. These often indicate worn rollers, misaligned tracks, or damaged springs. Inspect these components and apply lubricant where necessary to resolve friction issues.
Recommended
- Garage Door Repairs & Spring Repair | Fast Garage Door Service Near You
- Garage Door Services in Seattle & Surrounding Areas
- Elevate Your Home with the Best Garage Door Services in Seattle
- Cost of Garage Door Repair in Seattle: 2025 Guide for Local Homeowners – Summit Garage Doors | Seattle’s #1 Garage Door Repair & Installation