A garage door that starts to close, then reverses for no clear reason, usually points to one small part of the system – the safety sensors. These garage sensor troubleshooting steps can help you narrow down the problem quickly, protect your opener from extra strain, and decide whether this is a simple fix or a job for a technician.
Why garage door sensors fail in the first place
Your garage door sensors sit near the floor on both sides of the opening. They send an invisible beam across the doorway, and if that beam is blocked or misread, the opener treats it as a safety risk and stops the door from closing.
That is exactly what they are meant to do. The issue is that sensors are low to the ground, which makes them easy to bump with a bin, a bike tire, a shovel, or even a wet mop. Dust, moisture, wiring wear, sun glare, and loose brackets can all cause the same symptom – a garage door that will not close properly.
In homes and commercial spaces alike, the most common mistake is assuming the opener itself has failed. Often, the opener is responding correctly to bad sensor input.
Start with the safest first checks
Before you touch anything, keep people, pets, and vehicles clear of the door opening. If the door is stuck open, avoid standing directly underneath it while inspecting the system. Never force the door down if the safety system is acting unpredictably.
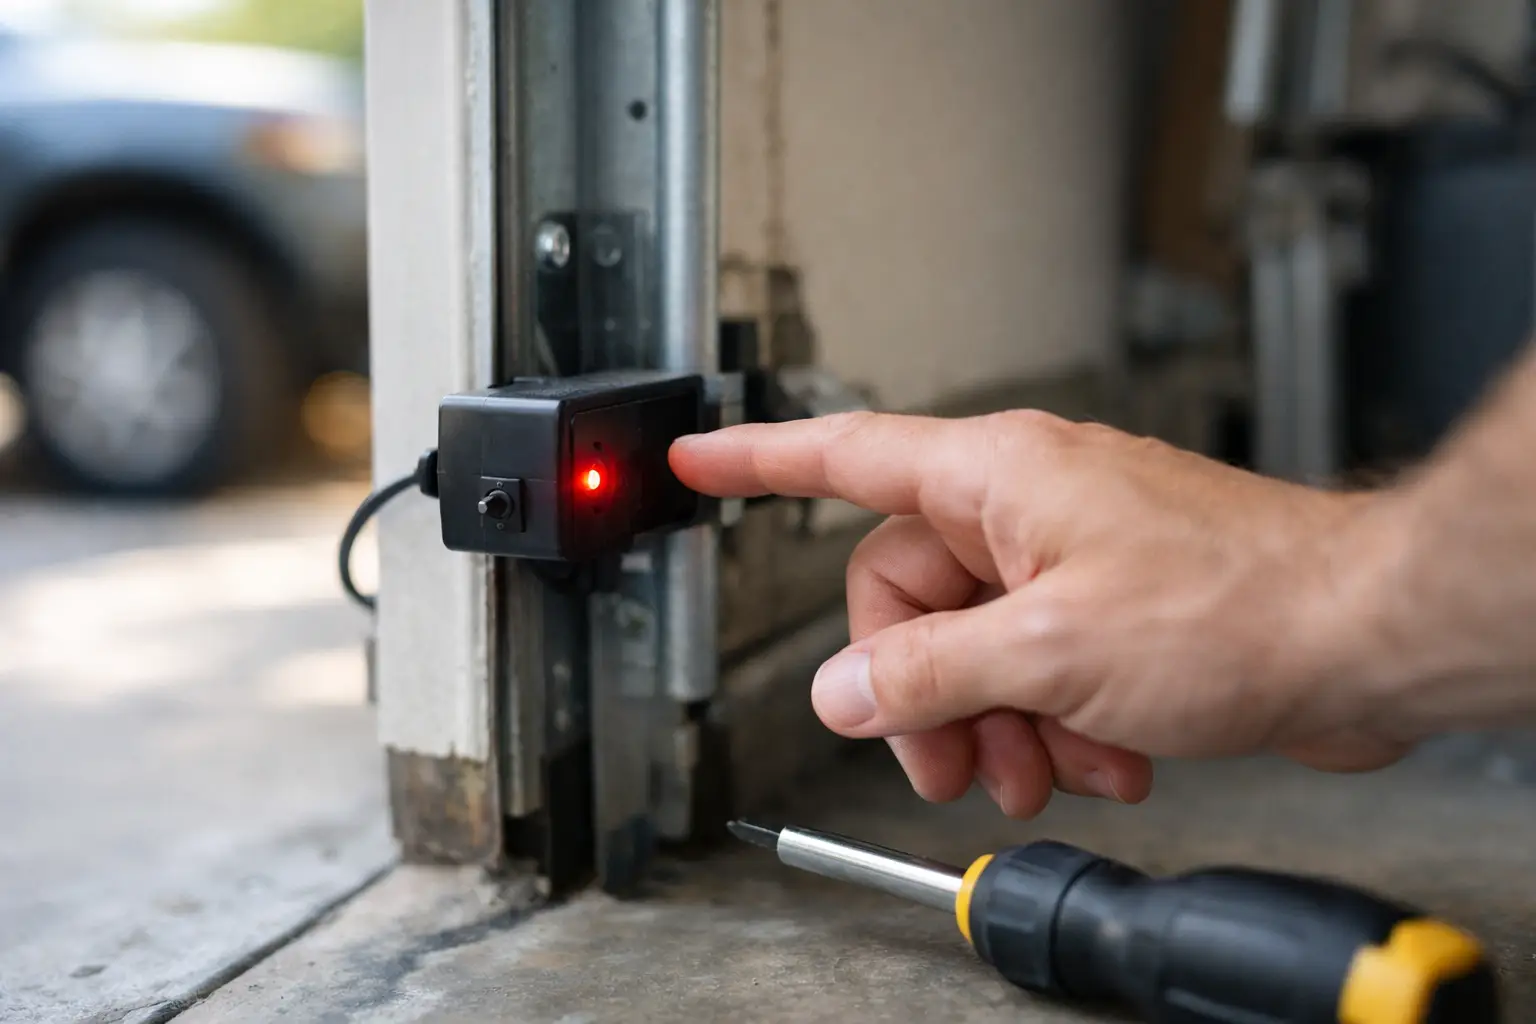
Look at both sensors near the bottom of the tracks. Most units have small indicator lights. In many setups, one light stays solid when it has power and the other stays solid only when both sensors are aligned. If one light is off, flickering, or dim, that gives you your first clue.
If you are unsure what the lights should mean, check the opener manual for your model. Different brands use slightly different light patterns, so the exact signal can vary.
Garage sensor troubleshooting steps that solve most problems
The fastest fix is often the simplest one. Start by checking whether anything is physically blocking the sensor beam. Leaves, storage boxes, tools, sports gear, or even a buildup of dirt can interrupt the line between the two units.
Next, clean the sensor lenses carefully with a soft cloth. Avoid abrasive cleaners. A dusty lens or light film of grime may not look serious, but it can be enough to interfere with the beam.
After that, inspect alignment. The sensors should face each other directly at the same height. If one bracket is bent or loose, the beam may miss by just enough to trigger a fault. Gently adjust the sensor until the indicator light becomes steady. This usually takes small movements, not force.
Then check the mounting hardware. A sensor can appear aligned while still shifting slightly every time the door vibrates. Tightening a loose screw may solve a problem that keeps coming back.
If the lights still do not look right, inspect the wiring. Look for pinched, frayed, or disconnected low-voltage wires running from the sensors back to the opener. Damage can happen over time from vibration, pests, moisture, or accidental impact. If the wire insulation is cracked or a connection has come loose, the sensor may lose power or send an inconsistent signal.
When the issue is not really the sensor
Some garage door problems look like sensor trouble but are caused by something else. If the door closes partway and reverses, a misaligned track, travel limit issue, or opener force setting may be involved. If the door is heavy, jerky, or loud, worn springs or rollers may be putting the whole system under stress.
That matters because replacing a sensor will not fix a door that is mechanically out of balance. In fact, chasing the wrong problem can waste time and money while the real issue gets worse.
One useful test is to watch how the door behaves when opening. Sensor faults mainly affect closing cycles. If the door struggles in both directions, hesitates, or shakes, there may be a larger mechanical problem behind it.
What to do if one sensor light is off
A sensor light that is fully off usually means one of three things: no power, a wiring fault, or a failed sensor. Start by checking the opener unit itself. If the opener has no power, the sensors will not either.
If the opener is powered and one sensor remains dark, inspect the wire connections at both the sensor and the motor head. Sometimes a wire slips loose from the terminal and can be reseated. If the wire looks damaged inside the insulation, replacement is often the better option than patching it.
If power and wiring appear normal but the light still stays off, the sensor may have failed internally. At that point, replacement is usually more practical than extended testing.
What to do if both lights are on but the door still will not close
This is where things get a bit less straightforward. If both lights are solid but the door still reverses, the sensors may not be the active fault. Check the door path for resistance, especially near the floor where debris or swelling from moisture can create drag.
You should also inspect the track for bends and the rollers for wear. On some systems, the opener interprets excess resistance as an obstruction, which can look similar to a sensor problem.
Another possibility is intermittent wiring. The lights may appear normal when the door is still, but vibration during operation can interrupt the connection. That is one reason recurring issues often need a proper service inspection rather than repeated DIY adjustments.
Weather, moisture, and seasonal changes
In the Pacific Northwest, damp conditions can create sensor trouble more often than homeowners expect. Moisture can affect wiring connections, brackets can shift slightly as materials expand and contract, and mud or road grit gets tracked into the garage and settles right where the sensors live.
Bright low-angle sunlight can also affect some sensor setups at certain times of day. If the door only misbehaves in the morning or late afternoon, glare may be part of the issue. Repositioning the sensor slightly or adding a manufacturer-approved shield can help, but it depends on the unit and the garage layout.
When to stop troubleshooting and call a pro
There is a clear line between basic inspection and repair work that should not be guessed at. If you have cleaned the lenses, confirmed alignment, checked for obstructions, and inspected visible wiring but the issue keeps returning, the system needs a deeper look.
Call a technician if the wiring is damaged, the brackets are bent into the track assembly, the opener settings may need adjustment, or the door has other symptoms like sagging, slamming, grinding, or uneven movement. Those signs suggest a broader safety problem, not just a sensor nuisance.
This is especially important for business owners. A commercial garage door that will not close reliably is not only inconvenient – it affects security, access, and daily operations. Fast diagnosis matters.
Preventing the same problem next month
Once the door is working again, a little maintenance goes a long way. Keep the sensor area clear, wipe the lenses occasionally, and avoid storing items where they can knock the brackets out of line. If your garage is used heavily, include the sensors in your regular visual checks.
It also helps to pay attention to small changes. Flickering sensor lights, delayed closing, or a door that reverses once in a while are early warnings. Taking care of those signs promptly is much easier than dealing with a full failure when you are already late for work or trying to secure the building at the end of the day.
For homeowners and businesses who want dependable service, a professional tune-up can catch sensor alignment issues, worn parts, and opener faults before they turn into an urgent repair. Summit Garage Doors sees this often – what starts as an occasional sensor issue can be the first sign that the full door system needs adjustment.
A garage door should close safely and consistently every time you press the button. If your sensors are saying otherwise, treat that as useful information, not just an annoyance. The right fix is often simple, but the safest result comes from knowing when simple stops being enough.